I never can seem to knit along to Project Spectrum. My stash just isn’t big enough to manage that, and with no yarn store for 200km, shopping just seems difficult. Besides, I enjoy a chance to focus on photography and other crafts for this part of my creative life.

This time, since green is one of the colours I am most attracted to for fashion these days, I thought I’d make some buttons. Thanks to my daughter’s help, we have a few photos. Here was my process:
(Please keep in mind that I am a rank amateur and have no idea just how durable these will prove to be, although I’ve done some reading and they should hold up fairly well. It’s not like I’ll be using them for any Extreme Buttoning Championships.)

Materials:
- polymer clay
- rolling pin protected with plastic wrap
- stamp
- circle cutter-thingamy
- skewer or toothpick
- paint
- tissue or rags
- sealant
Roll out the polymer clay. I found the plastic wrap left wrinkly lines, so I just flipped it over and used the back side that was smooth from the waxed paper. Impress it with the stamp. This is a snowflake stamp that has pleasing curlicues on it.
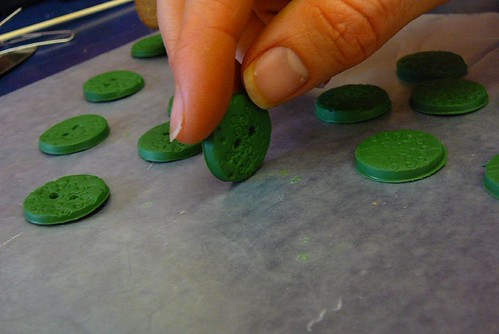
Cut out button-sized circles. I used a round yellow plastic thing from the kids’ old playdough drawer that’s about the size of a quarter. I’d like to hunt up something smaller for even smaller buttons.

Use the skewer to make button holes. Flip them and tidy up the back side.

Roll them sideways along your work surface to flatten the little ridge that forms when you press the cutter down on them.
Bake. Cool
Rub paint into the impressed pattern, then rub off the paint on the top. I used Kleenex because I didn’t want to stop and find rags. When I was rubbing off the unwanted paint, I found it useful to use a dampened tissue. I blotted it on, then rubbed the surface.
Let dry. Seal. I had glossy outdoor sealant for birdhouses and such like. So I used it. After all, I’ll wear the sweaters I knit or the tops I sew into the outdoors, right?

Drag everyone in the house to your buttons and point in their direction. Say, “Look, look! Buttons! I made them and they’re surprisingly awesome.” Bask in the glow of your awesomeness.
___________
I also took advantage of the chance to make a pendant. I used the same process with a different stamp. The paint here was diluted with water to be more of a wash and I applied at least 2 layers of different colours: gold over green, green over deep blue. The end result is about 4cm square.


What a great project! I’d love to hear what you have to say about them after you’ve used them in the construction of something else.
And green is a great colour… especially in April on the prairies…
This is very, very cool! 🙂
You *are* an awesome button maker! 🙂
These are seriously fabulous.
I’d be basking too.
Those are some seriously impressive buttons. Now I want to try too!!!
Wow! These are so pretty; I especially love the pendant!
What completely unique and gorgeous buttons!! Must try this out…thanks for all the info!
Wow, gorgeous! I think I’ve just added to my summer projects list!
Wicked cool!
Thanks for the tutorial. It looks interesting. I may just have to give it a try.
That is the neatest thing I have seen in awhile. I am ready to dig into my craft bin so I can make some buttons too. Thank you so much for the tutorial.
Such a fantastic idea! I have a feeling that Fimo would stand up to wear and tear better than Sculpey.
I’ll be interested in hearing how well they do stand up to being worn.
Very, very cool.
“Bask in the glow of your awesomeness.” I can do this. Do I have to wait until I’ve made buttons? I could do with some basking right now…
What fun! I have an entire book on making buttons, but haven’t gotten around to trying any. And I also have a really large cache of Sculpey. Hmmm….
They are so cool!
LOVE the green buttons!
I came over here from Lolly’s Monday Faves. Great tutorial, best use for polymer clay that I’ve seen yet, and I’m going to do it!
These are beautiful–I love the green and the curlicues!! Totally bookmarking this for future fun.
Beautiful buttons! I love the idea of rubber stamps as your decorative elements; never would have thought of that!